DIY wall art with recycled materials: unleash your creativity
DIY wall art with recycled materials involves using items like old magazines, fabric, and bottle caps to create unique and eco-friendly art pieces that enhance your home decor.
DIY wall art with recycled materials is a fantastic way to express your creativity and make a positive impact on the environment. Ever thought about what you can create from things you already have at home? Let’s dive into some exciting projects!
Why choose recycled materials for DIY art?
Choosing recycled materials for your DIY art projects is not just a creative choice; it’s also an environmentally friendly decision. Using items that might otherwise be discarded can lead to unique creations while helping the planet.
There are several reasons to consider this approach. Firstly, it reduces waste, keeping materials out of landfills. Secondly, it can save money, as you won’t need to buy new supplies. Furthermore, using recycled items often sparks creativity, leading to unexpected and beautiful outcomes.
Benefits of Using Recycled Materials
When creating art, using recycled components has amazing advantages:
- Eco-friendliness: You help reduce the carbon footprint.
- Cost-effective: Save money by using what you already have.
- Unique designs: Create one-of-a-kind pieces.
- Encourages creativity: Think outside the box with unconventional materials.
Moreover, incorporating recycled materials into your projects allows you to tell a story. Each piece evokes memories or represents past uses, making your art not just visually appealing but also meaningful. Think about common items such as glass jars, old magazines, or scrap wood. These can transform into stunning wall art with a bit of imagination.
Creative techniques for making wall art

When it comes to creating wall art, there are numerous creative techniques that can inspire your next project. These methods can transform ordinary materials into stunning pieces that reflect your unique style. Let’s explore some of these techniques that you can easily incorporate into your DIY projects.
One popular method is collage. This technique allows you to combine various materials like fabric, paper, and even photos to create a visually rich design. Layering different textures not only adds depth but also makes each piece unique. You can experiment with colors, shapes, and arrangements to see what resonates with you.
Painting with Unconventional Tools
Another exciting technique involves using unconventional tools for painting. Instead of traditional brushes, try sponges, leaves, or even your fingers. These tools create unexpected patterns and textures, bringing life to your wall art.
- Sponges: Ideal for creating soft patterns or splatter effects.
- Leaves: Use them as stamps for natural shapes and designs.
- Fingers: Perfect for a hands-on approach and blending colors directly.
- Textured objects: Items like lace or bubble wrap can leave interesting imprints.
Cutting techniques also offer a creative way to experiment with shapes. You can use tools like craft knives or scissors to cut out designs from paper, cardboard, or even thin wood. These cutouts can then be layered or framed to add dimension to your art. The final result will bring a fresh look to any space.
In addition, incorporating mixed media adds an exciting twist. This technique combines various artistic elements such as painting, drawing, and even digital art. You can overlap these elements to create a harmonious piece that tells a story or conveys emotion. The combinations are limitless, and each piece becomes a reflection of your personal journey.
Step-by-step guide to popular projects
If you’re looking to create stunning wall art, following a step-by-step guide can help simplify the process. Here, we’ll break down a couple of popular projects that utilize recycled materials.
One exciting project is making art from old magazines. Start by gathering various magazines in colors and styles that catch your eye. Cut out interesting images, patterns, or quotes that speak to you. Once you have a good selection, arrange them on a canvas or large piece of cardboard. Play with the layout until you find a design you love. Finally, glue the cutouts down, and consider adding a clear sealant to protect your artwork.
Creating a Bottle Cap Mosaic
Another fun project involves creating a mosaic out of bottle caps. Begin collecting caps from bottles and cans. Clean them thoroughly to remove any residue. Then, sketch a design or pattern on a wooden board that will serve as your base. Next, start gluing the bottle caps according to your design, making sure to vary colors and sizes for a vibrant look. Once finished, seal it with a clear coat to enhance durability.
- Gather materials: Collect magazine cutouts and canvas.
- Arrange the layout: Play with the placement of cutouts.
- Glue down: Use a strong adhesive for security.
- Seal your artwork: Protect it with a clear sealant.
Lastly, consider making a framed fabric art piece. Choose a piece of fabric you love, and cut it into shapes or letters. Use a sturdy frame to secure the fabric, adding layers to give depth and interest. This simple yet elegant design can brighten up any room.
Accomplishing these projects not only gives you beautiful wall art but also allows you to express your creativity while being eco-friendly. So, gather your supplies and get crafting!
Tips for displaying your DIY wall art

Displaying your DIY wall art is just as important as creating it. How you showcase your work can enhance the overall vibe of your space. Here are some effective tips for displaying your DIY wall art.
First, consider the location of your artwork. High-traffic areas like living rooms and hallways are ideal places to display your pieces. This ensures that your art gets noticed and appreciated by visitors. Make sure the walls in these areas are adequately lit to highlight the colors and textures of your creations.
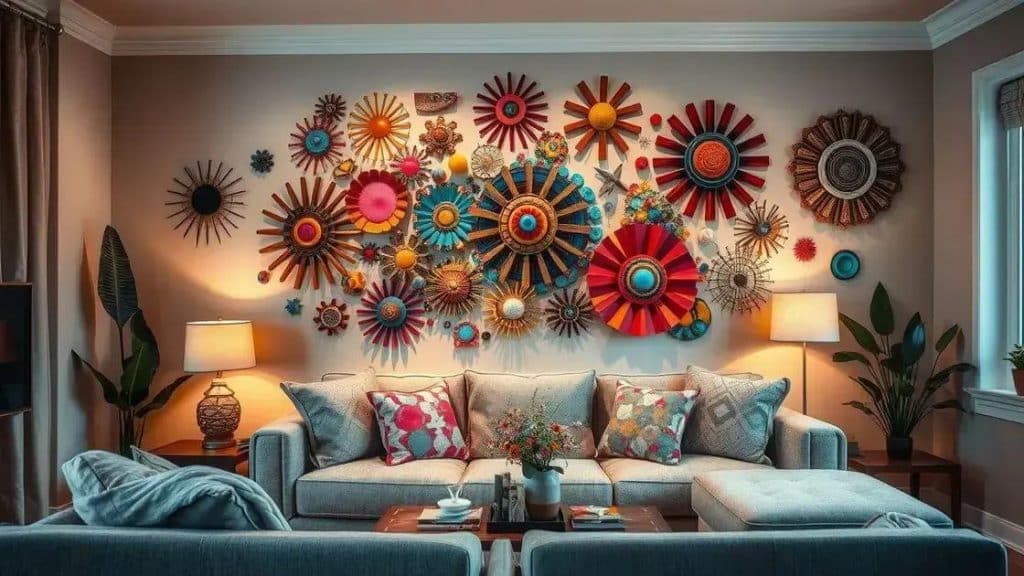
Creating a Gallery Wall
A gallery wall is a fantastic way to display multiple pieces. Choose a collection of your favorite works and hang them together to form a cohesive display. When arranging a gallery wall, think about varying the sizes and shapes of the frames to create visual interest. This mix can turn an ordinary wall into a stunning art display.
- Mix frame styles: Use different frame styles for a dynamic look.
- Keep spacing consistent: Maintain even spacing between pieces for harmony.
- Include personal touches: Add family photos or travel souvenirs to personalize the wall.
Another idea is to use hooks or clips to hang your artwork. This approach allows you to easily change out pieces whenever you want to refresh your decor. You can also create a unique display by using a string or wire system where you can clip art in any arrangement you desire.
Lastly, consider the height at which you hang your artwork. Ideally, pieces should be hung at eye level for the best viewing experience. If your art is too high or low, it can be easily overlooked. Aim for a height that invites people to stop and appreciate your work.
FAQ – Frequently Asked Questions about DIY Wall Art
What materials can I use for DIY wall art?
You can use a variety of materials such as recycled paper, fabric, wood, bottle caps, and even old magazines to create unique pieces.
How do I hang my DIY wall art securely?
Using picture hooks or heavy-duty adhesive strips can help ensure your artwork stays securely in place on the wall.
Can I switch out my wall art easily?
Yes, by using clips or a string system, you can easily change out your wall art whenever you feel like refreshing your decor.
What are some creative ways to display my wall art?
Consider creating a gallery wall, using floating shelves, or grouping your pieces by color or theme for a cohesive display.


